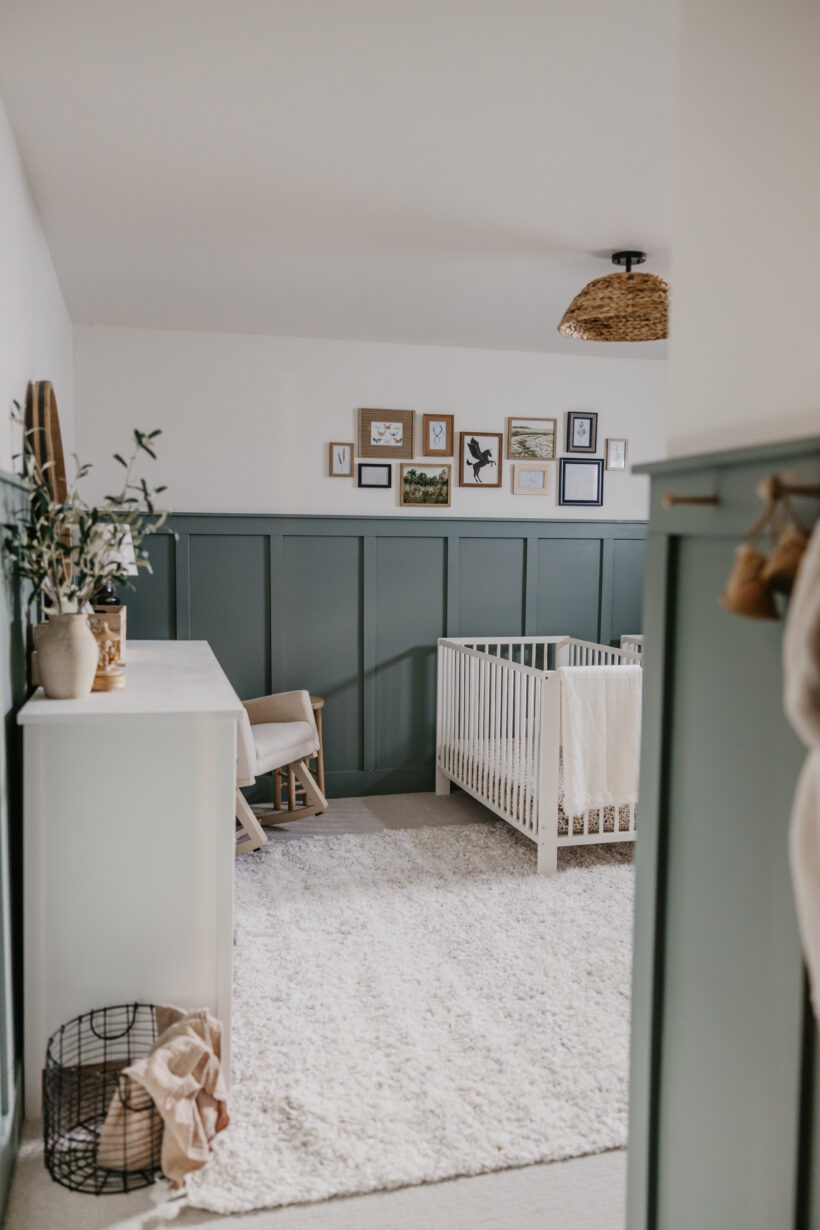
Board And Batten Wall
Wow. I can’t believe this is the same room, you guys!! How amazing is the board and batten wall?! It used to feel so dingy + dark in a gross basement & now it feels clean, bright, and so much cozier. When we were first looking at this house, I remember looking at the basement + thinking, “this won’t be toooo hard to split these two rooms.” What. A. Joke.
Maybe if I had more of a construction background it would have been easier, but honestly, I think tearing down the wall, adding a rough opening, moving the electrical lines + making a new wall is definitely some of the hardest things I’ve done to date. And definitely don’t want to do it again anytime soon. But it was all so worth the struggle in the end.
My first step in this room was of course, skim coating the walls to rid the room of the awful 70’s texture that was going on. You can read my steps in my last post if you missed it! I wish I had a better before picture of it, but you’ll just have to trust me it was terrible.


Skim coating went so much faster this time because I knew better how to do it and I had a better tool, this amazing drywall sander my parents bought me for Christmas. Overall, the ceiling and the walls took me a couple hours over the course of three days versus in Owen’s room, it took me three weeks. Lol. Practice really does make perfect!
Then after the drywall was fixed, it was time to tear down the wall! I started by pulling it off in pieces + took it totally down to the studs so I could see where the electrical lines were. Then we turned off the power, undid the line from the electrical box + capped the ends until we had the rough opening in. I had never done this before, so I didn’t feel confident in teaching you all how to do it, so I’ll share the videos I watched at the end of this post.


Then once we had the new wall up and the door jamb in place, it was time for the board and batten!
Board and Batten Wall Steps:
- First up, I needed to add the baseboards so I could build my board and batten on top of it. I used all 1 x 6 mdf for my trim again and just cut the lengths I needed to go around the whole room. I cut the boards with my miter saw and highly recommend getting one if you don’t have any saws already. Then I nailed them to the wall with my brad nailer.
- Since I didn’t skim coat the lower half of the walls (purposely) I covered it up with hardboard. It was really easy to use and I just nailed it up where I wanted it. If you feel really set on your decision, you can also use Liquid nails and then brad nail it into the wall. But since I thought I may take this down one day (far far in the future) I didn’t glue it on. I just used my circular saw to rip the boards down to the size I needed and then put it up on the wall.
- After that, I added my 1 x 4 mdf top cap. i followed the same steps as I did with my baseboard but this cap touched the top of the hardboard.
- Next, it was time to cut my battens. For these I used a 1 x 3 mdf board and cut them all at 48 inches, the same height as my hardboard. I decided to space mine 15 inches apart, but you can space them anywhere from 12 inches to 24 inches as a standard look. Once they were all cut, I nailed them up with my brad nailer, which is a super important tool if you plan on doing a lot of projects that involve decorative accent walls, etc.
- After all my battens were up, I added the final piece, the top cap trim! For this I used a 1 x 2 mdf board and did the same thing, cut it down to size and went around the whole room with it. Then I nailed it in from the top down into the 1 x 4 to secure it.
- After everything was nailed up, I went through and filled all my nail holes + caulked my seams and edges. Again, not necessary, but just gives it that professional finished look.
- Then once everything dried, which usually is a full 24 hours, it was time to paint!


From start to finish, this room took about 6 weeks. It could have gone faster if I had hired someone out instead of doing it myself when I had time, but I also probably would have spent a lot more money and wouldn’t have been able to afford to do it right now. So here’s to doing it ourselves and learning so much in the process! I love this room and how it turned out + can’t wait to watch my girls grow up in here!


Materials I Used:
- Pry bar
- Sledge hammer
- Multitool
- Rough opening instructional video
- Electrical wiring video
- Hardboard
- 1 x 6 mdf boards
- 1 x 4 mdf boards
- 1 x 3 mdf boards
- 1 x 2 mdf boards
- Brad nailer
- Brad nails
- Miter saw
- Circular saw
- Safety glasses
- Hearing protection
- Caulk
- Wood filler
Paint Colors I Used:
- Village Green in eggshell by Behr for the board and batten
- Aged Beige in eggshell by Behr for the door, closet and window trim
- Swiss Coffee in eggshell by Behr for the walls and ceiling
- Black in satin by Behr for the doors