Mirror Frame DIY: How To Update A Basic Bathroom Mirror
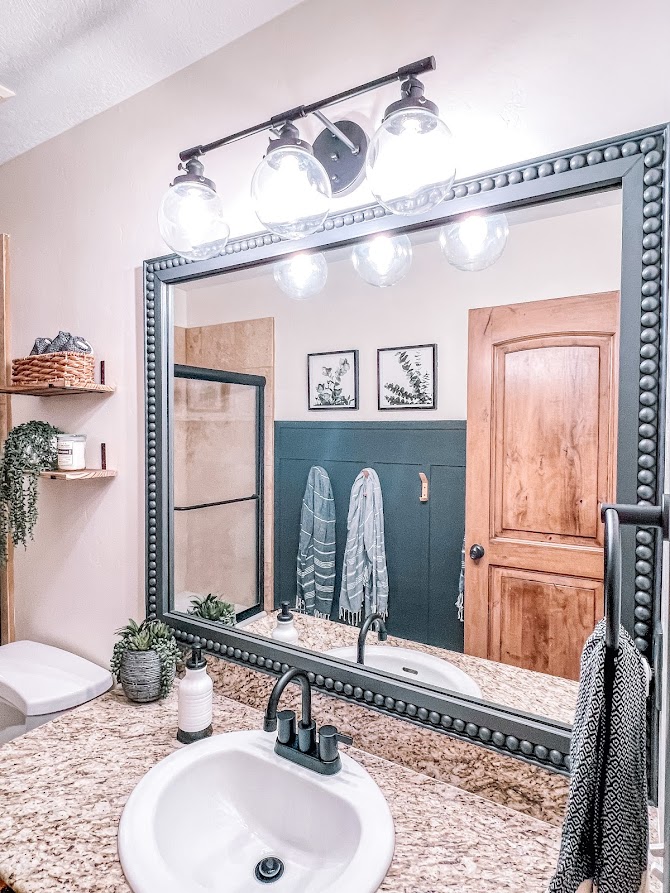
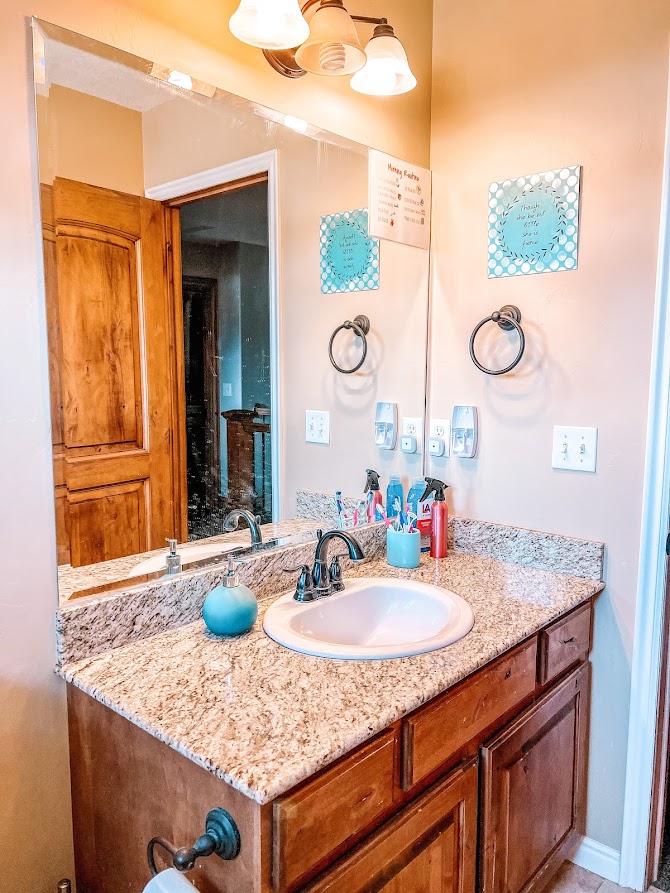
Ready to dive into this mirror frame DIY? Is your mirror builder grade? A plain rectangular chunk of glass glued to the wall? No trim or moulding or decorative framing or style? Yeah, ours too. That’s why I decided to upgrade our mirror with a custom-made beaded frame. The difference in the look of my kids’ bathroom is night and day, but the project was super easy and saved a ton of money (because we all know mirrors can be ridiculously expensive, especially large mirrors).
Before I get into the how-to of it all, first, let me introduce myself. I’m Brittany from @Brittstronger on Instagram. I’m a wife of almost 17 years and a mom to 4 kiddos. I have had the opportunity to be a stay-at-home mom to my children, but I dabble in fun and interesting things to keep myself busy. I decided to give DIY a go about 2 years ago when I wanted upgrades to my home but didn’t want to pay the big bucks to hire someone else to do it. Gradually I have transformed different spaces in my home, all while on a budget! It has become very therapeutic for me and I get to create beautiful spaces and stretch my abilities to the limit.

So let’s get to the fun part! While redoing my children’s bathroom on a budget, I decided against removing their large builder’s grade mirror and make a frame to really upgrade the space. I knew I wanted to make a frame for the mirror, but all the tutorials I could find were basic wooden frames. So one day after examining a much smaller round mirror I had purchased for another bathroom renovation, I was totally inspired and realized I could recreate a similar frame on my own for under $50!
Even if this is your first DIY woodworking project ever – you’ll nail it (well… you’ll actually glue it). Here’s the simple overview: Measure the mirror, get moulding pieces, half wooden balls, cut the wood, glue all the pieces together, paint, and finally glue the wood to your mirror. And you’re done!
This is easily a quick “weekend” project. Go to the hardware store today, cut the pieces of wood, glue and paint to dry overnight. Glue them to your mirror the following day.
Are you ready to update your bathroom? Here are the deets:
Mirror Frame DIY Supplies:
- (2) 1/2 in x 3 in x 8 ft Primed MDF Board from Home Depot
- (2) 5/32 in x 1-1/8 in x 8 ft PVC Lattice Moulding
- (2) 1/2 in x 13/32 in x 8 ft Composite Bead Moulding
- 200pcs 25mm Half Wooden Balls Unfinished Split Natural Wood Beads
- DAP RapidFuse All Purpose Multipurpose Adhesive
- Mirror Adhesive
- Paint (I used Iron Ore by SW, color matched at Lowe’s)
- Optional: Paint Sprayer
- Paintable Caulk
- Wood Filler

TOOLS FOR YOUR MIRROR FRAME DIY:
- Miter Saw (or have Home Depot cut you wood for you)
- Caulk Gun
- Measuring Tape
- Level
- Pencil
- Clamps
- Rubber Mallet

STEP 1. PURCHASE YOUR ITEMS.
- Frame thickness. I chose 1/2″×3″ mdf boards to frame our mirror. 5/32 x1-1/8 pvc lattice moulding and 1/2 x 13/32 Composite bead moulding to frame out the beads on top of the mdf boards.
- Overlap. The boards should overlap the edges of the mirror by 1 inch on every possible side, so estimate the lengths of wood you need accordingly. (Mine did not overlap on the bottom or the right side due to it being on the edge of the wall and the top of the backsplash.)
- Paint. Choose your preferred paint color, I chose Iron Ore by SW to match the focal wall I had created.
- Mirror adhesive. Be sure to buy a construction adhesive designed to adhere materials to mirror or glass. Otherwise, the glue may not be strong enough to hold your wood frame on the mirror.
- Half Wooden Balls. You will need to find these at a craft store or order online. I chose to use 25 mm (1″) bc it made it easier to measure out how many I needed and it ended up fitting prefect between the two mouldings.
STEP 2. WOOD CUT LIST.
Note: cut to fit your mirror! Do NOT base your measurements on our bathroom mirror.
Tools. Use either your miter saw, circular saw, hand saw with miter box or have the boards cut at Home Depot.
- (2) 1/2 x 3 x 48” (1” overhang on the left side to hide the edges of the mirror. The right side of our mirror touches the wall.)
- (2) 1 x 4 x 41” (1” overhang on the top only, to hide the top edge of the mirror. The bottom of our mirror touches the countertop.)
- (2) 5/32 x 1-1/8 x 48″
- (2) 5/32 x 1-1/8 x 41″
- (2) 1/2 x 13/32 x 48″
- (2) 1/2 x 13/32 x 41″

STEP 3. GLUE MOULDING TOGETHER.
- After you cut each board to size, I recommend waiting to cut the angles until after the pieces are glued together. Then, lay Both MDF boards side side up, glue the PVC Lattice Moulding flush to the inside edge, adding DAP RapidFuse glue about 12″ at a time (this glue dries very quickly, so you don’t want to glue the whole board at once) and use clamps to hold it in place since it will be slightly bowed.
- Next, take the half wooden balls and use as spacers as you proceed to glue down the 1/2 x 13/32″ Bead Moulding. This piece should not need to be clamped down, but proceed to only glue about 12″ at a time.
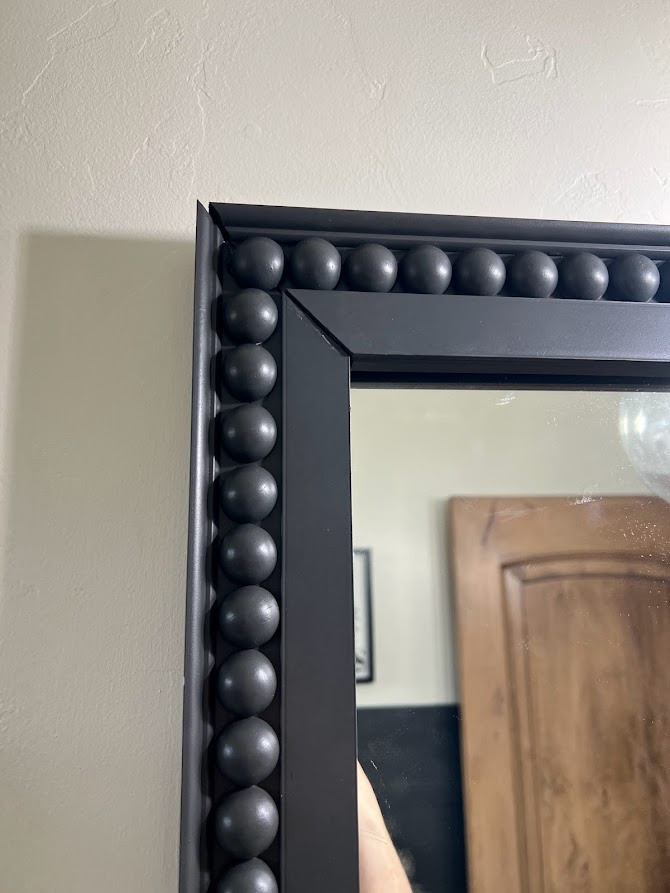
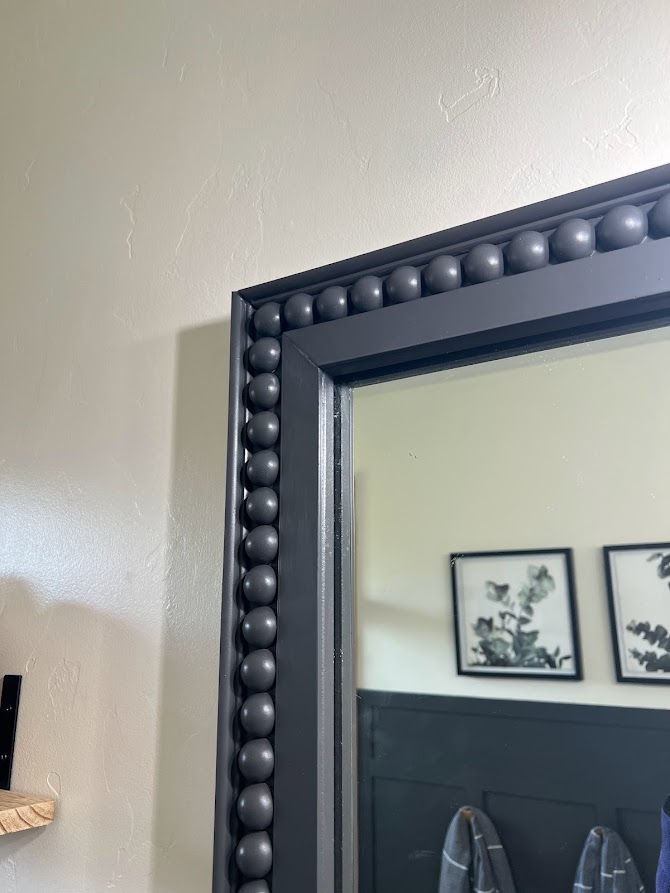
- Once you have all pieces glued and dried in place, remove the half wooden balls you used for spacers and proceed to cut the angels for each corners of the boards.
- Each board will need to be cut at a 45 degree angel and have non-parallel cuts, like a picture frame.
- Make sure to have the smaller end of the angel cut toward the flat board and the longer end toward the bead moulding as shown below. (If any moulding pieces come apart, just glue them back on and hold for at least 30 seconds to dry.)


- Finally, it’s time to glue and place each half wooden ball…
- I put each frame piece together, as shown above, so I could visually see how it’d look.
- For the edges of the frame, I made sure to overhang a bead so it met up with the other piece of the frame and covered both edge pieces, as shown below.
- I then started out putting a bead of glue on each bead and placing them one at a time, but quickly found it much quicker and more efficient to do about 4-5 inches of a squiggly line of glue and quickly placing each bead right next to each other. (Some beads might be a pretty tight squeeze, just hit it into place using a rubber mallet)

STEP 4. PAINT THE FRAME.
- I recommend using a paint sprayer, you can even rent one from Home Depot.
- Take your paint and thin it according to the paint sprayers directions (mine only needed about 2 Tbs of water mixed into 2 cups of paint).
- Paint in long, quick strokes overlapping the ends of the frame. You will need to go at different angles to get in-between the beads.
- Allow adequate amount of time in-between each coat to dry, if you don’t it will cause paint drips (which you can use a foam brush to brush out if this does occur).
- Make sure to paint all sides of the frame, even the bottom side (the bottom only needs to be a quick coat), the reflection of the frame will be shown.


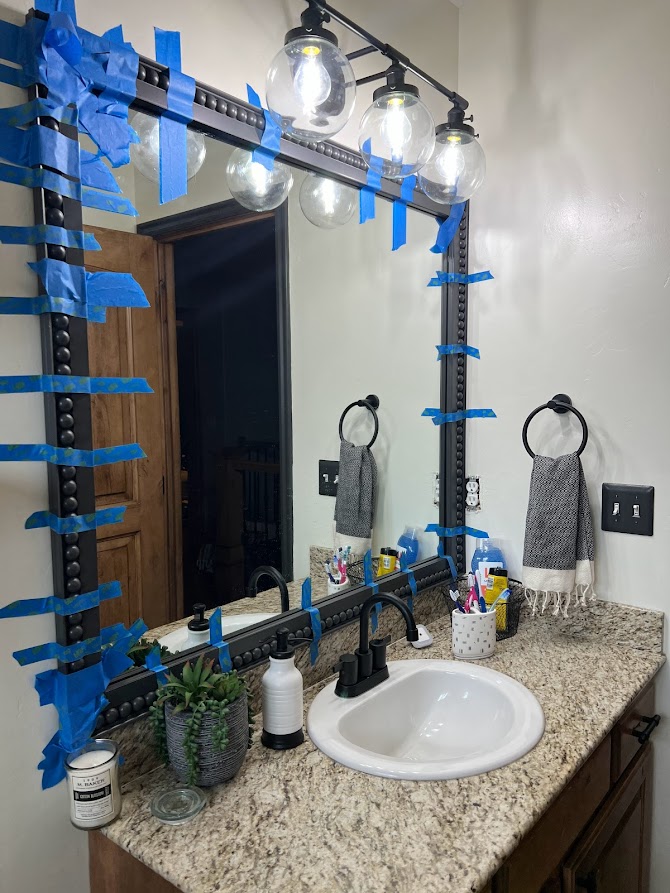
STEP 5. INSTALL THE WOOD FRAME.
Materials to have on hand: level, caulk gun, mirror adhesive, wood frame pieces and painter’s tape.
- Once the paint is dried you can proceed to installing the wood frame onto your mirror.
- With your level resting on the wood, dry fit the bottom piece of your mirror frame with a 1 inch overhang on the bottom and sides if possible (no overhang on the bottom of ours since the mirror touches our countertop). The goal is to hide the edges of the unfinished mirror without the need for additional trim.
- Place the piece of wood face down on a nearby surface. Apply a wavy or zigzag bead of mirror adhesive to the back of the bottom wood piece. Avoid placing any glue on the inside 1″ of the inside frame as it will be seen from the reflection of the mirror.
- Press the bottom wood piece in place on the mirror with 1 inch overhang (or flush with the countertop like ours).
- Tape the piece in place with plenty of painter’s tape.
- Repeat for each side wood frame piece, and lastly, for the top wood frame piece. You can never use too much tape. You do NOT want these boards falling off the mirror.
- Let the adhesive dry and cure for 48 hours before removing the painter’s tape.
**I recommend to do this, I did NOT, but wished I had. I would glue each corner edge together into a complete frame and clamping the ends together. Wipe off any excess glue and make sure to allow complete time to dry. (If you choose to do it this way, you can avoid having to hang each individual piece separately, which will help avoid the sides and top sliding. I seriously wish I had done this.) Line the whole frame with a wavy line of mirror adhesive avoiding the inside edge, going inwards about 1″. Then hang all at once and tape into place.**
STEP 6. CAULK AND PUTTY AS NEEDED FOR YOUR MIRROR FRAME
- After 48 hours, remove the tape.
- Caulk where the corner edges meet up.
- Wood fill any uneven edges and allow time to dry.
- Sand the wood filler and wipe clean.
- Paint and stand in awe of the magic of caulk and putty!
**If you chose to build the frame before hanging it on the mirror, you can do this part before hanging and taping it to the mirror.**

Your Bathroom Got Quite The Upgrade With This Mirror Frame DIY!
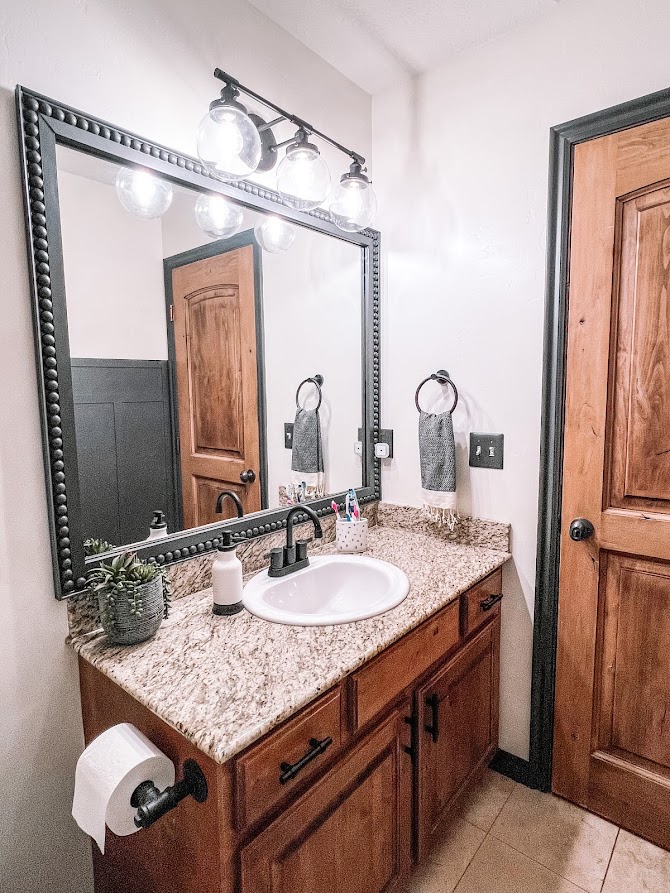
What an AMAZING upgrade, y’all. I hope it’s the first of many bathroom DIY projects in your home.
If you’re interested in more beginner-budget-friendly DIY projects, or you want to see the rest of the bathroom transformations, then follow along on Instagram!
For more amazing tutorials from Our Faux Farmhouse contributors like this accent wall from Savannah Kay Designs, check out the Our Faux Farmhouse blog here.