Painting Tile Floors | Our Tips, Lessons & Tools!
Before I jump in, hi! I’m Jenna, part of Jonathan and Jenna. We’re a DIY couple living in Arizona, renovating and upgrading our first-ever home. We love saving money and making our home decor vision come to life!
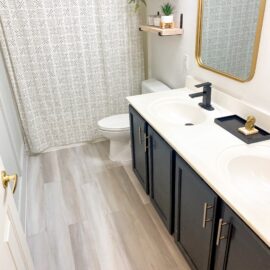
With a lot of bravery and patience, I painted our tile bathroom floor. Here’s how I did it and what I learned along the way!
Materials for Painting Tile Floors:
- Rust-Oleum Floor Paint (Coat 1, Coat 2)
- Frog Tape
- Small roller and paintbrush
- Stipple brush (if you have grout lines)
- Socks (read step 7 to see why)
- Stencil (if you choose to stencil)
Our Process For Painting Tile Floors:
- Prep with tape, clean existing floor, and let dry
- Apply base coat and let dry
- Apply top coat with stencil for a design/pattern
- Add second coats if necessary
- Apply clear sealer coat and let dry


In-Depth Steps For Painting Tile Floors In Bathroom:
Step 1: Clean your floors. Clean them GOOD. I swept, vacuumed, wiped down, vacuumed again, and used Rust-Oleum floor cleaner and Krud Kutter spray.
Step 2: Tape off. Try not to get your tape on the tile or you’ll pull it off at the very end and some of the floor paint will come off and you’ll be super frustrated and your husband will have to use a box cutter to cut the tape away.
Step 3: Paint base coat. Here is the floor after one coat of Coastal Fog (left) and then after two coats (right):
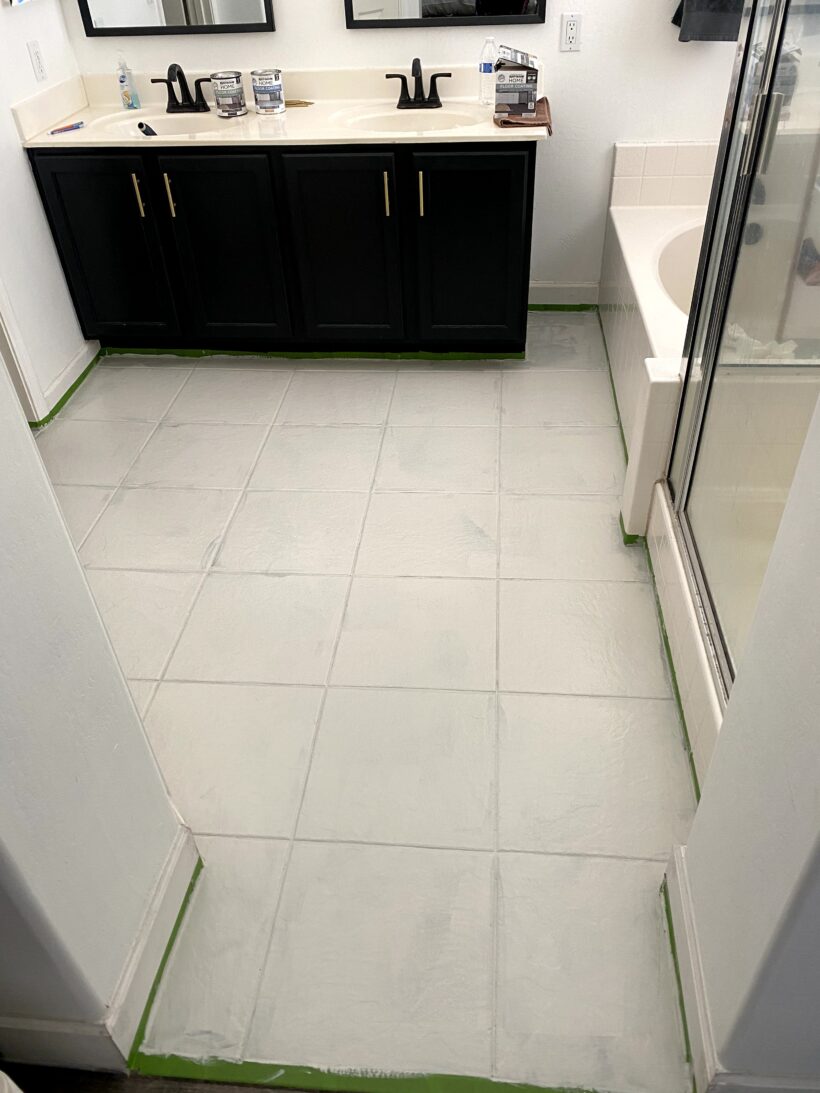
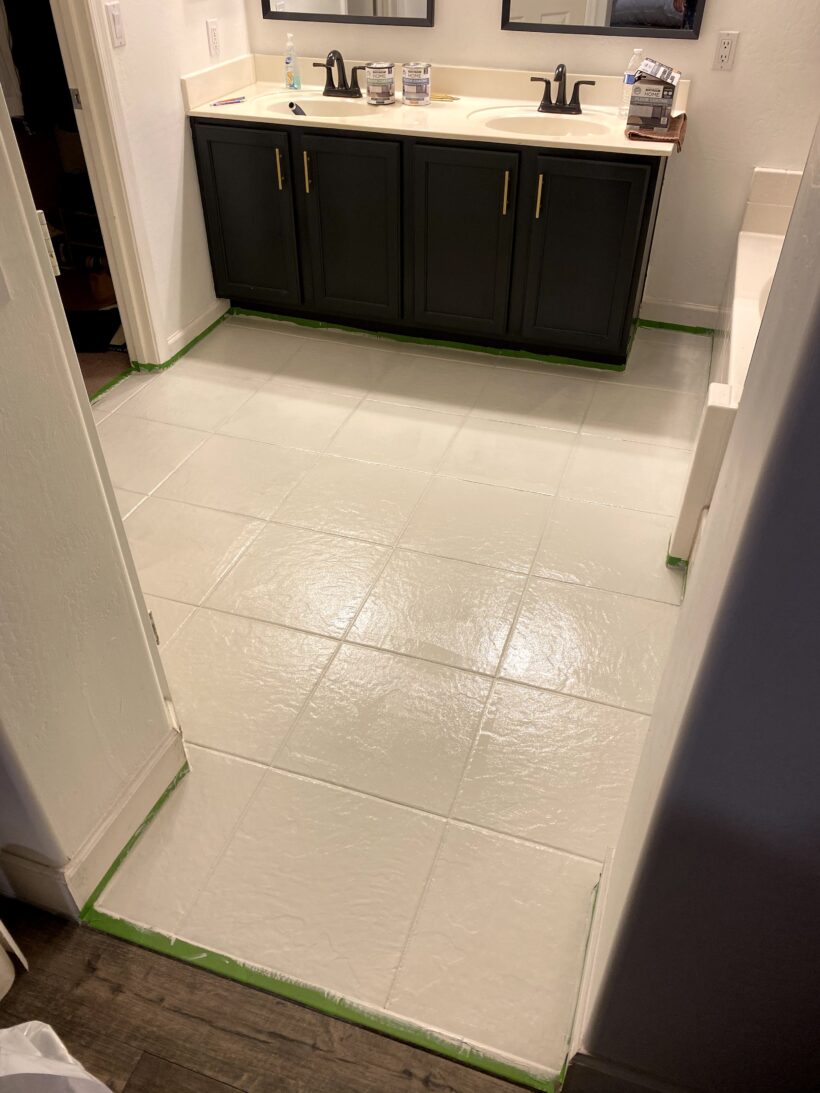
I waited 4-6 hours between each coat to let it dry. This first paint job was pretty easy! The paint went on well, I used a paintbrush for the edges/corners, and it dried well.
But the hard part was just beginning . . .
The stencil I used was Honeycomb by CuttingEdgeStencils. Their packaging and instructions were wonderful, I was feeling really confident. Their stencil even came with some mini practice stencils and stipple brushes.
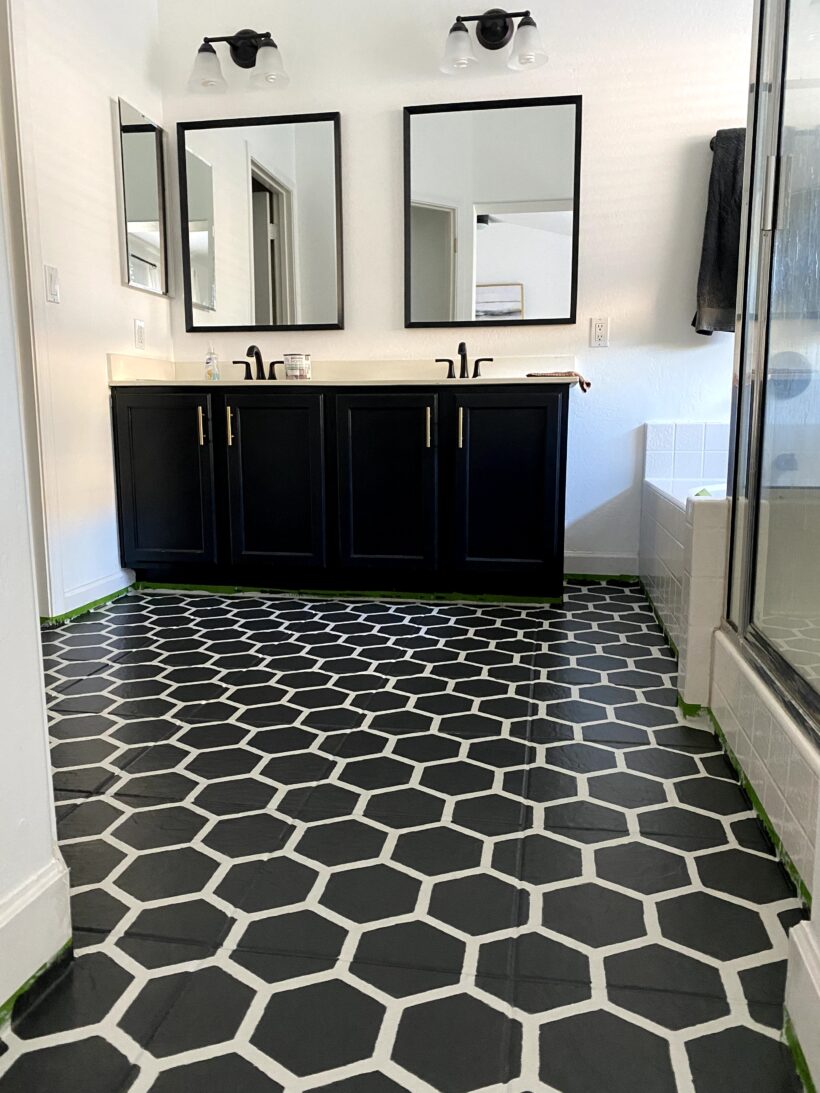
Step 4: Tape stencil down and paint! I taped the stencil down, made sure to look for stray hairs (hair/fuzz will be a BIG pain when it comes to floor painting), and I used a small roller with barely any paint on it. The more paint, the worse it will turn out. After rolling the roller in paint, I rolled it over a paper towel to really dry it out. Then I rolled it over the stencil lightly. I realized quickly the grout lines would be a problem. We have textured tiles and thick grout lines, so I went back over them with the small brush.


Step 5: Repeat, Repeat, Repeat. I had to wait 10-15 minutes after each stencil section to lay the stencil down again. With the pattern I chose, I couldn’t just randomly lay it out on my floor while one section dried. I had to go piece by piece, making sure it all matched up.
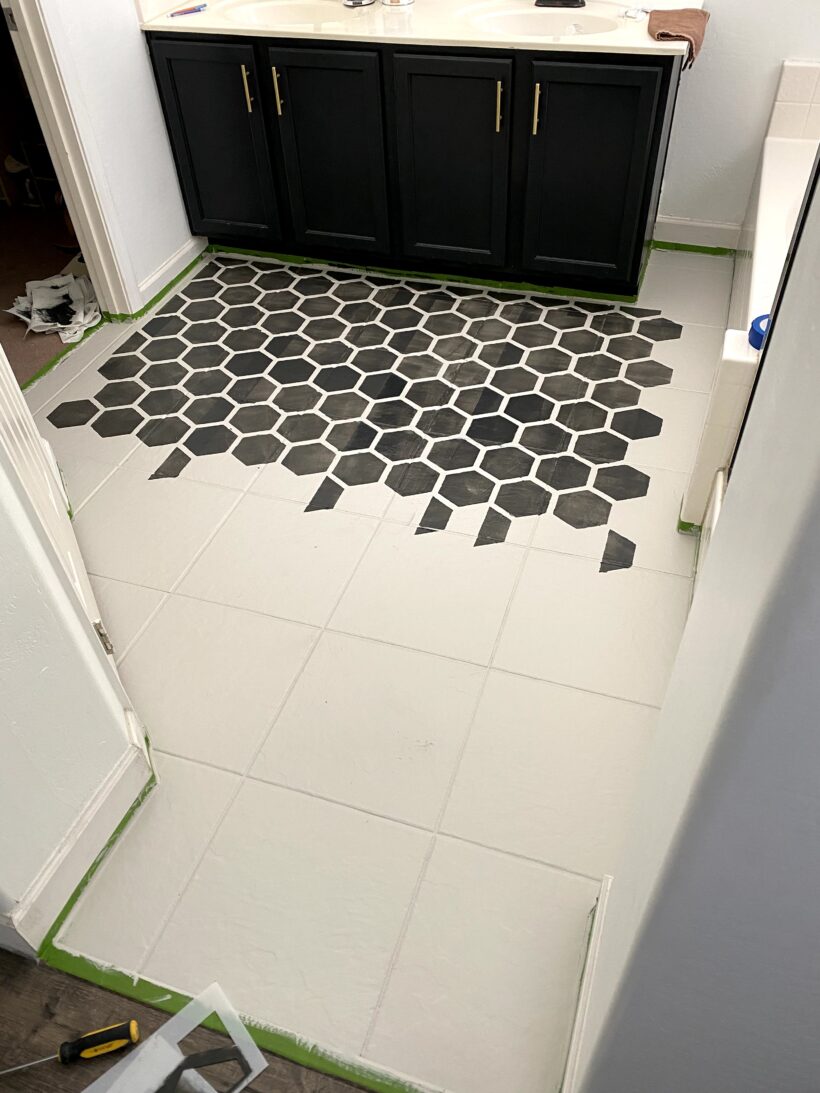

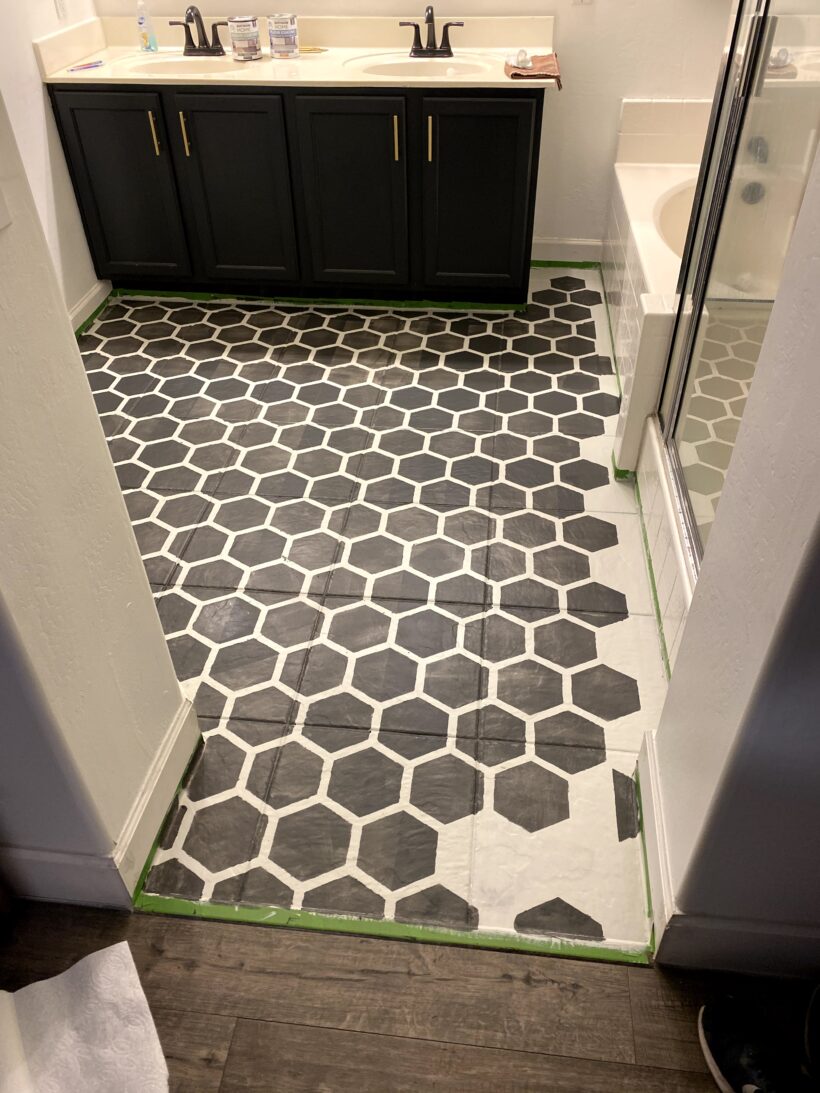
Step 6: Keep stenciling, add a second coat. If you look at the earlier pics above, the paint wasn’t even, and some hexagons looked better than others. I felt REALLY discouraged in the beginning, thinking, “What did I get myself into?” As I stenciled more and more, I started to see it all come together. Yes, up close it was VERY messy and not crisp or clean, but the floor was starting to take shape. After we added a second coat, it looked much better.
Step 7: Clean up the messy parts. After stenciling, messing up, waiting for things to dry, and wishing it was all over, I finally got most of the floor done. One of the final steps is to go back with a small paintbrush (like a tiny one for watercolors) and clean up the white lines and touch up.
The reason I put “socks” on the list is because each time I went in to paint, I switched out my socks. My old socks would track in hair, fuzzies, and random specks. Finding stray hairs was the WORST part of this, or realizing I painted a hair into the floor. New socks will help each time. Barefoot is too sticky and would leave a footprint on the floor when I walked on it.
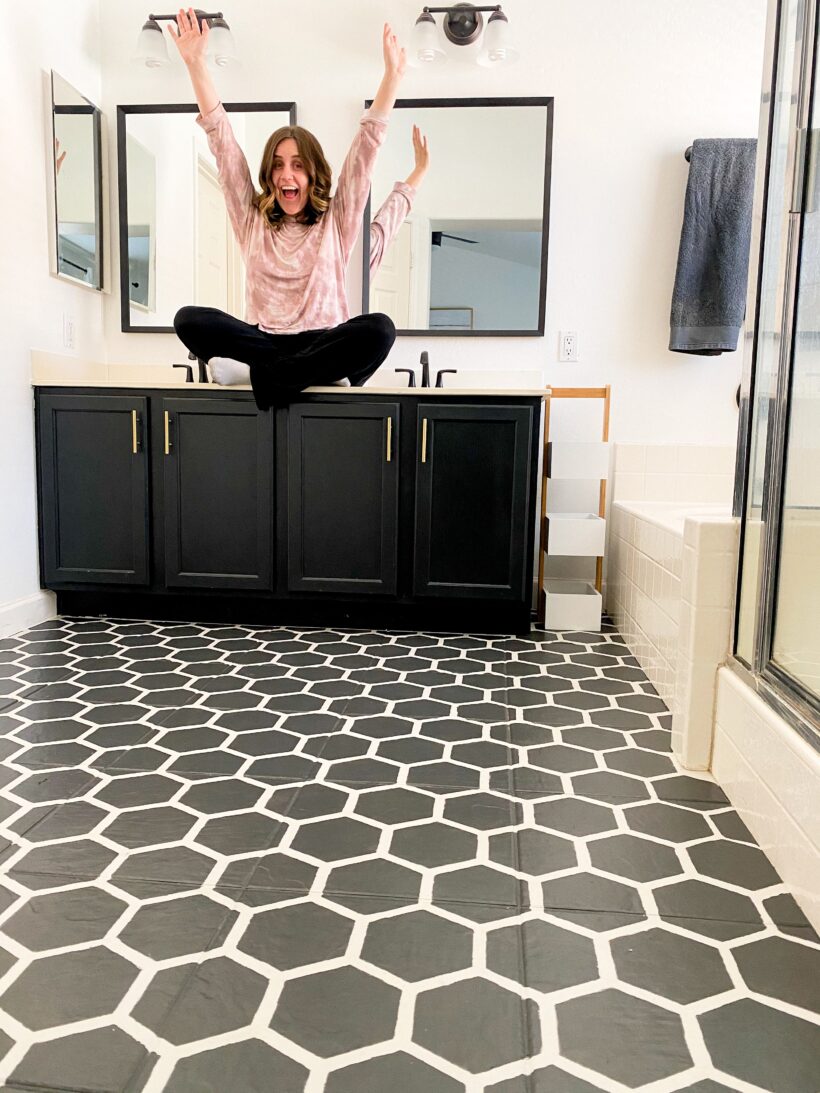
Step 8: Paint the clear top coat and let dry for 24-72 hours. This last step was easy, except for the part where I kept looking at all the flawed parts of the floor and internally criticized myself. But then I stepped back and went WOW!!


MORE TIPS AND TRICKS FOR PAINTING FLOORS
1. Pick a stencil that fits your floors. I still love the Honeycomb style and would pick it all over again, but if I went with a single-square stencil (a stencil that fits perfectly over one square tile), this would’ve been a LOT easier. I would’ve avoided the grout lines and this project would’ve been done faster.
2. Be careful on the corners. The edges/corners were the hardest part. Sometimes we folded the stencil to fit against the bathtub or in tricky spots around the toilet. It did NOT turn out perfect, so be ready to touch up or paint freehand.
3. Vacuum in between each coat. The stray hairs and specks were frustrating. I had read other bloggers’ experiences before, and some said to paint as quickly as possible (within 1-2 days right away) so your floors don’t sit and accumulate dust and dirt.
4. Get some Tylenol for your back and knees. I did SO much squatting, bending over, and moving around, my body was feeling it after the first day. Depending on your room, you may not have a place to sit (and you don’t want to sit right on your freshly painted floors).
5. Buy two stencils. If I did a floor again (which I probably won’t!), I would buy two stencils and cover more ground. Or, I’d use the other stencil as the “clean” stencil and switch off. My stencil got messy pretty quickly, so when I went to lay it down for the next section, sometimes the dark paint would get onto the floor in places I didn’t want it to! After that happened, I wiped my stencil down after each use (mostly wiped down the back of the stencil, the side that was going to be touching the floor).
6. Paint your floor all one color. If you don’t find a stencil you love, pick one color and paint your tile. It looks really good, and it’s WAY easier than stenciling! The Rust-Oleum paint is made specifically for floors and has a formula that is meant to last.
I didn’t sand or prime because Rust-Oleum paint covers it all. I did 2 coats of Coastal Fog, 2 coats of Charcoal Gray, and 2 coats of the Matte TopCoat.
Follow along @jonathanandjenna for more fun projects like this!
For more awesome tutorials from Our Faux Farmhouse contributors, check out these recent posts: