Our Built In Bunk Beds!
Operation Double Built In Bunk Beds Is Underway!
First, we created bracing for the built in bunk beds.
Before anything else, we had to make sure the house was structurally capable of supporting the bunk beds. When we had it built, we asked for a strip of 12-inch bracing around the back three walls of the room. This took some forethought, but it was much easier adding the bracing during construction than it would have been to add it later.
Then, Brad got to work framing the built in bunk beds.
We used painter’s tape to map out the four bunks and middle staircase. We had to get the measurements perfect for each full bed, and we had to make sure there would be enough space for a roomy staircase in the middle. Again, I’m so glad we went into our build with a plan for these bunks!After the framing was complete, we also ran electrical for lights and outlets in each of the bunks. This is totally optional, but I for one like reading in bed and charging my phone close by. Why not add those features to bunk beds?!
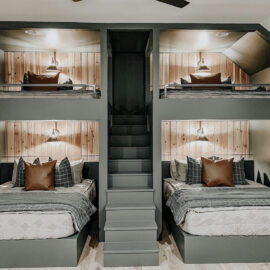
We built a staircase! (No ladders here!)
Instead of a more traditional ladder, we opted for a staircase between the two sets of bunks. It’s just easier to navigate (for kids and adults), and there’s way less room for injury. Plus, if someone leaves the top bunk in the middle of the night, they’re less likely to wake up the kiddo on the bottom bunk.
Next step, beds!
This room is looking more and more like a bunkhouse every day! We’re finishing up the platform beds, and then we’ll add the headboards and final touches. Let’s hope I can settle on a paint color before then!
What We’ve Learned Since Starting the Project
These built in bunk beds have truly been a labor of love. They’re not done yet, but we’ve already learned so much throughout the process. Here are our top tips!
Tip 1: Make sure an adult can fit.
Even if you’re making built in bunk beds for toddlers, make sure an adult can both sleep in the beds and navigate to the top bunks. You never know when a kiddo might get sick or a houseguest might need a place to crash. This means keeping your stairwell wide and using standard-sized mattresses, like twins or fulls.
Tip 2: Think about electrical ahead of time.
After we finished framing, Brad ran electrical for lights and outlets on each of the bunks. That way, you can read or charge your phone from bed. I’m so glad we planned ahead for this and didn’t have to add electrical as an afterthought later on.
Tip 3: Take your time!
If there’s one thing we’ve learned in our 17 years of DIY, it’s that speeding through a project usually means revisiting it to fix your mistakes. Since these built in bunk beds are such a technical project, we really wanted to take them one step at a time. We still have a ways to go, but we’ll keep you updated on our progress!
I’m so excited to get this room finished and watch our kids fall in love with their double bunk beds. Tackling this project together has been an absolute whirlwind, but I wouldn’t have it any other way! Stay tuned for more updates and photos!
For more awesome tutorials from Our Faux Farmhouse contributors, check out these recent posts: